

Well, things have been changing. Shapeways has changed their pricing structure on the Frosted Ultra Detail, Frosted Extreme Detail and cast metal parts. The good news:
Many of my designs became cheaper!
The bad news:
Some of my multipart designs, such as the sets of 2 and 4 FC-150 trucks - did not see as much benefit, and a few designs became unprintable. So, I am at work revising a few models. I have taken down all the offending parts currently, but I will be getting those back up as soon as I can. In addition, the track roller gauges will be going up.
The walls project hit a bit of a roadblock, and I am once again reworking the models. However, the Gilpin cars came out very well. They do need minor modifications now that I have my hands on them, but they too will be coming soon in HOn2. Other versions - HOn30, Nn3, Zn2, maybe even On30, On2, Sn2, and N may also be coming.
Next major project - a locomotive for the cars!

3D Printed Model Railroad Parts and Projects
Subscribe To
Monday, June 5, 2017
Thursday, April 13, 2017
Projects Coming to Fruition
Yesterday included the arrival of a box from Shapeways, with some new test prints contained within. Not all were successful, but several will soon be for sale from the ModelWorks. First up, let's look at the new Roller Gauges:

These are roller gauges for T-gauge track (3.2mm). I printed them in White Soft and Flexible (Left), Clear Acryllic (Middle) and Metal (Right). The metal gauge needs to have some left over casting material cleaned from the rail gaps, but all three gauges fit nicely on the T-gauge tracks I have. Which means, I now have a tool to lay T-gauge, Zn2, and Nn18 (or Nn2) track by hand. The metal gauge is obviously the best for handlaying, but the others are cheaper and may work well as long as they are not near the soldering iron.
Using a similar design, I also produced roller gauges for Z-scale track (6.5mm).

They are shown here on MT track, and they also work well on the new Atlas Z-scale Flextrack. I haven't tried them on Peco, Rokuhan or Marklin yet, but those will be tested before I release the gauges. You can see that I cleaned out the metal gauge's grooves. My preference is the metal and clear acryllic gauges. The White Strong and Flexible Gauge works, but doesn't have the same precision as the others.
In addition to the gauges, I also printed a new version of my T-gauge Station in Frosted Extreme Detail. The version comes with several spurs of detail parts.

I went for gusto on this print. Here are some closeups of the station.

The model includes interior fireplaces, walls with doorways, and stairs.
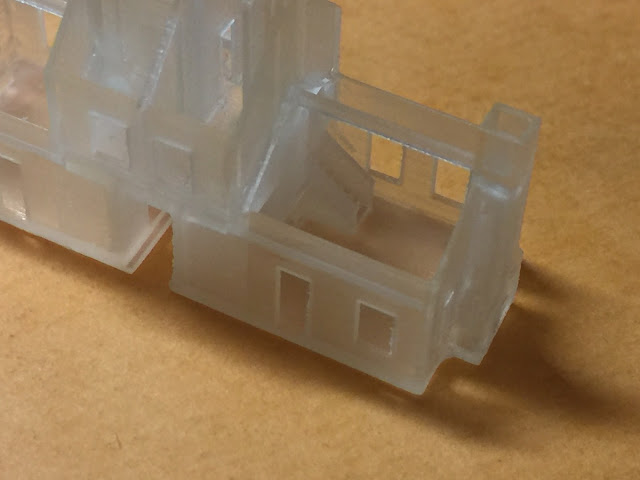
Yes, stairs. See them in the center of the photo? Or how about this view.

And yes, they are scale sized. But that is not all. On one of the spurs are the roof pieces and the chimney caps. Plus, there are windows and doors for the model.

The other spur contains furniture for the station. Yes, T-scale (1:450) furniture.

There is a fishbelly stove, tables, benches, chairs, a bed, desk, a cabinet and a bar. Can't see them?

The desks are on the left, then the bed, the round tables are on their sides, followed by a "J" shaped bar and the station waiting room benches. They got a bestine bath and cleaning last night, and next up will be a bit of primer before I start assembly. I'm excited for the finished product. Just need to do the decals for the exterior details.
Another building item was a set of doors for my modular wall system. I got the first two prototypes yesterday. They are already for sale, but this is the first time I have had them in my hands.

On the left is a standard sized door, on the right is a panel roll-up door. The standard door even has a door knob. The paperclip is pointing toward it. Need to zoom in?
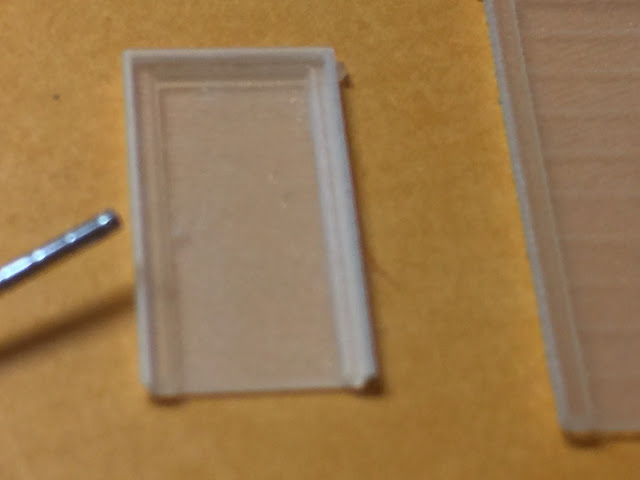
Okay, I am at the limits of my camera's ability to focus, but you may just be able to make out the door knob here - the small blob of white on the left side of the door. You will notice that I made the door frame integral to the door in order to print this.
After their cleaning, I did try the doors in the walls I have already printed. Note that they are not yet painted, but here is what they look like.


They fit like a glove, and it looks like the design works well. So, that is encouraging. Next up in this project is an improved modular wall design. I am hoping to reduce the costs a bit, and provide for a number of brick types and bond configurations.
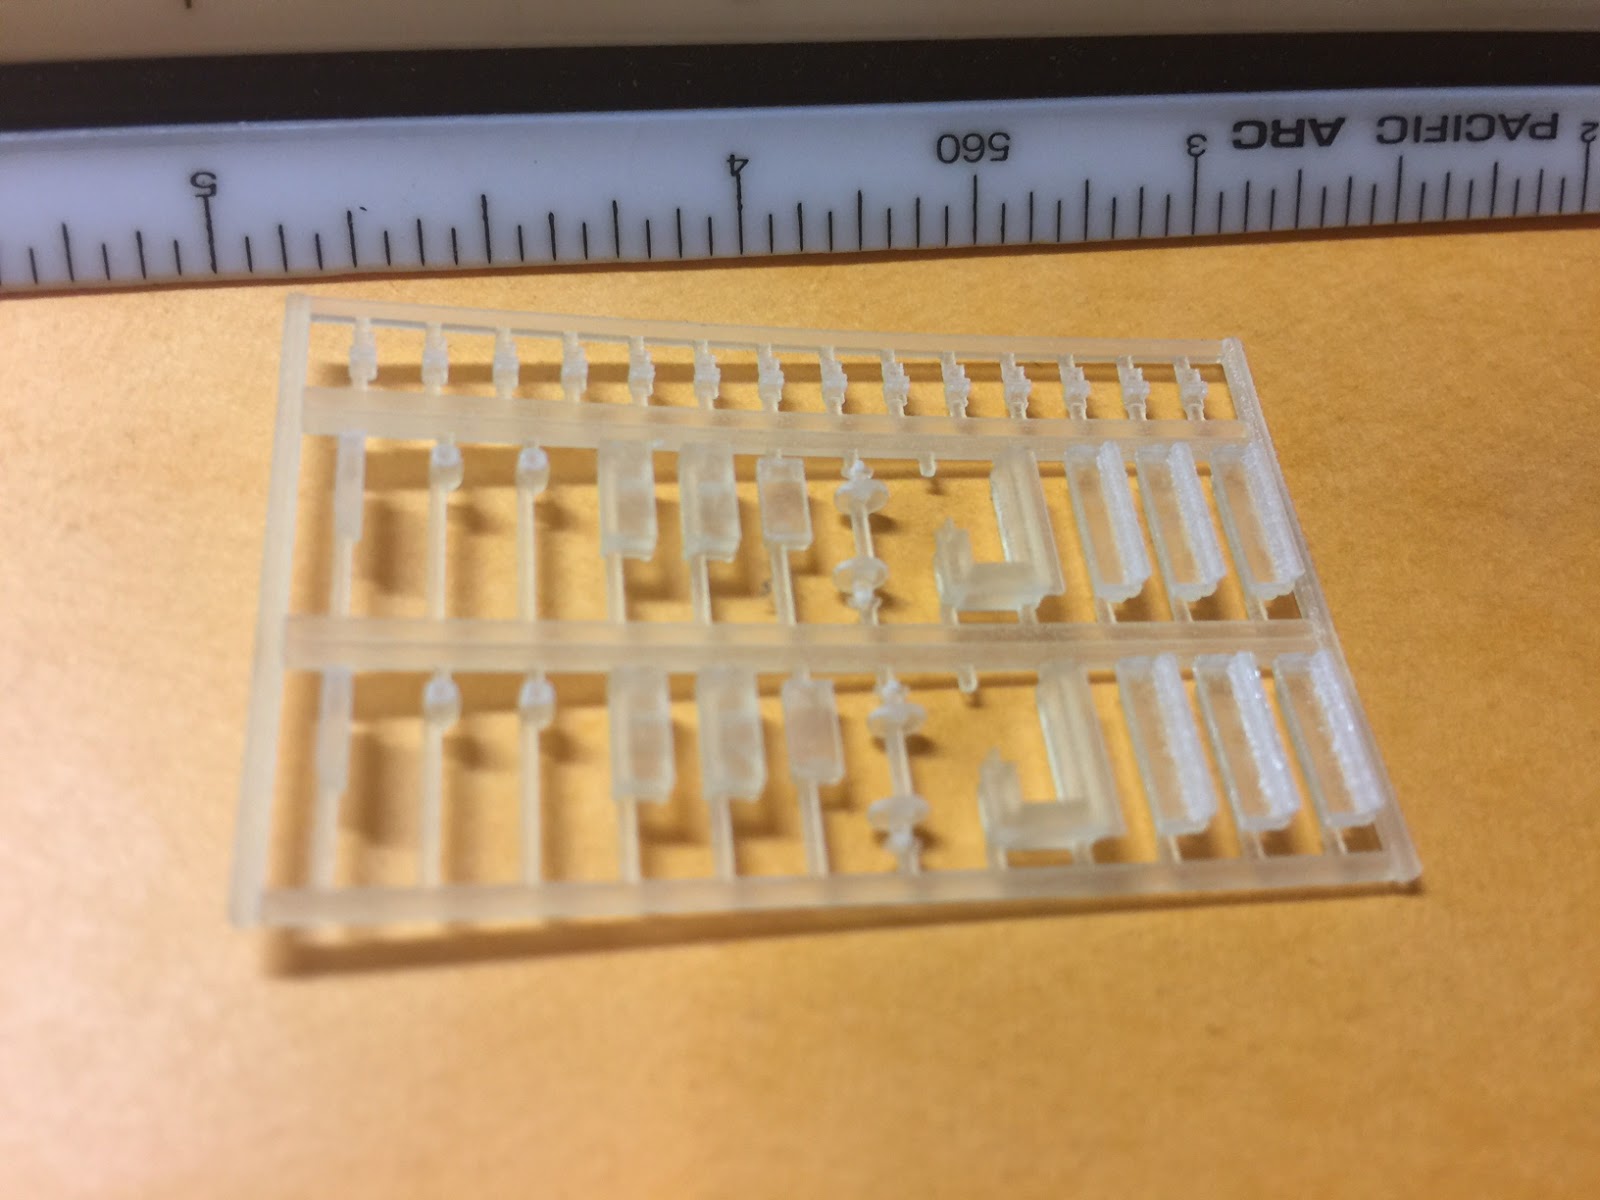
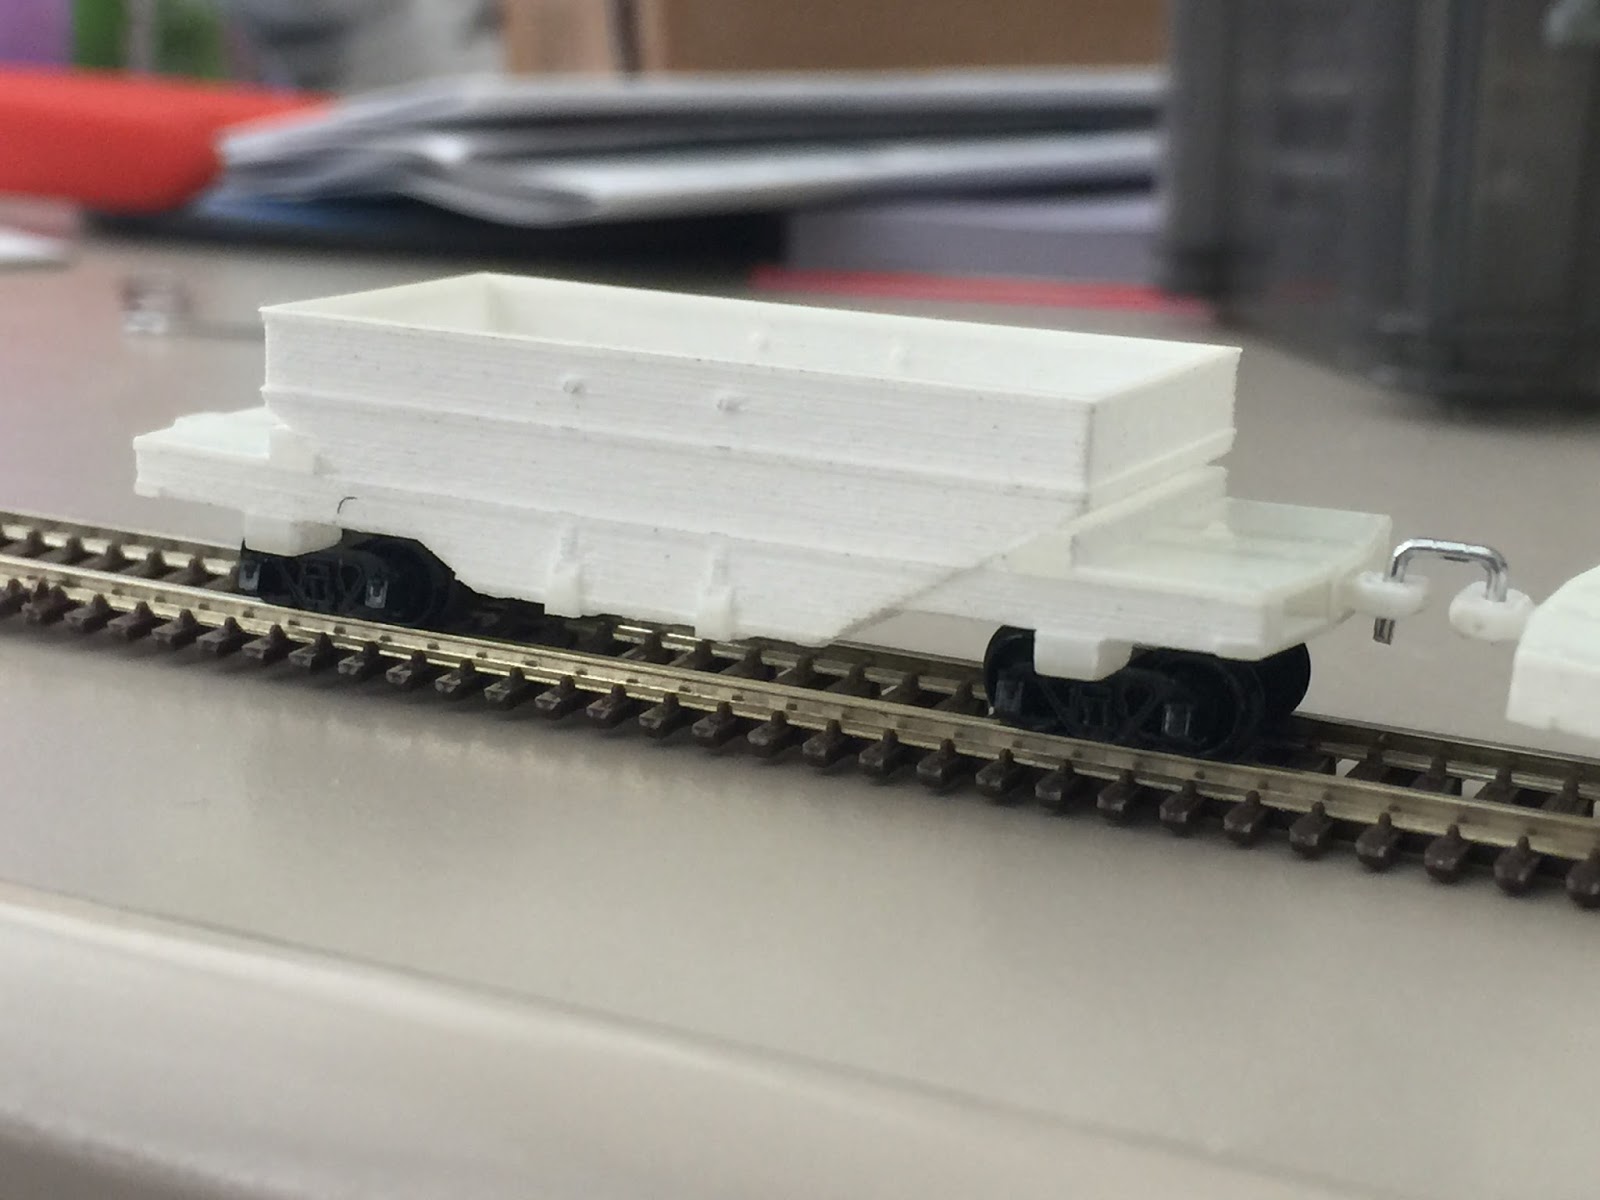
There was one more project that I got prototypes for last night. The HOn2 Gilpin Ore Car (using Z-gauge track - technically 22.3" gauge).
I tried printing the car a number of different ways. I tried the metallic plastic (top), followed by the White Strong and Flexible Nylon, a Polished Nylon, and as a Frosted Ultra Detail part.
These cars used link and pin couplers, and I also designed a set of them for this car, and printed them in Frosted Ultra Detail (top), Black Nylon, and Elastoplastic.
Finally, the cars also had brake wheels, which are of a geometry that I cold not find already available. This was surprising, since the drawings for the cars call out a different wheel style, but I found two photographs that clearly indicate that the brake wheels looked like those I printed. My best guess is that like the Link and Pin couplers, which were manufactured for the Gilpin Gold Tram by the Colorado and Southern shops, so too were these brake wheels.
The couplers were eyeopening. A close examination of the couplers revealed that the elastoplastic couplers lost a lot of detail, and in fact, do not fit in the existing coupler pocket. They are elastic alright, much more so than I needed. The tolerances on the Black Nylon couplers are better, but still don't fit in the pocket. Unfortunately, the spring features designed into these couplers did not print well either in Black Nylon. They are just too fine. (I thought so going in, but gave it a try. Fortunately, the Frosted Ultra Detail couplers did print well, and with enough resolution to both fit the couple pocket and hold the spring detail. Upon testing the springs (arranged as cantilever beams) even work as designed.

 The coupler has three springs built into the shank of the coupler. Each spring is designed as a cantilever beam. At the normal position, none of the cantilevers are engaged with the coupler pocket, but as the coupler is displaced from its center position, the beams deflect and will push the coupler back towards a neutral position. I've now tested the design on the first prototypes and they work as designed. However, only the Frosted Ultra Detail print produced working springs. Time will tell if the coupler fatigues or not. I'm hopeful that the coupler will work out.
The coupler is designed to use a piece of wire (such as that of a paperclip) as both the link and pin. The U-shaped link-pin simply goes through the hole in the top of the coupler. So, the coupler will ultimately transfer all of the weight of the train to the body of the car. Hopefully, the Frosted Ultra Detail plastic is strong enough for the trains I envision. Worst case, there actually will be broken couplers.

The cars are tiny - a little more than 2 inches long, but they also measure out to within +/- 1 inch of the actual length of the car. They also feature bolts and rivet details. But these are not really visible unless printed in Frosted Ultra Detail. With couplers the car looks like this:

And as an example, I used a paper clip to test the coupler hole size.

I haven't installed trucks yet, or a few other details, including the brake stem. The brake wheels look really good in closeup views.

The outer ring is actually part of the support structure. The brake wheel is actually composed of an HO-scale 1-inch diameter round bar. I may actually make these thicker given that I do not have an actual dimension on the size of the bar used, just to make these a little easier to handle.
All of these parts have had a bestine bath and ultrasonic cleaning. Today, I temporarily but a set of trucks on one car (the wrong type, but at least it was a set of trucks), and made a first attempt at a link-pin from a paperclip. Grabbing a piece of the new Atlas Z-scale flex track, here is the prototype on the rails for the first time.

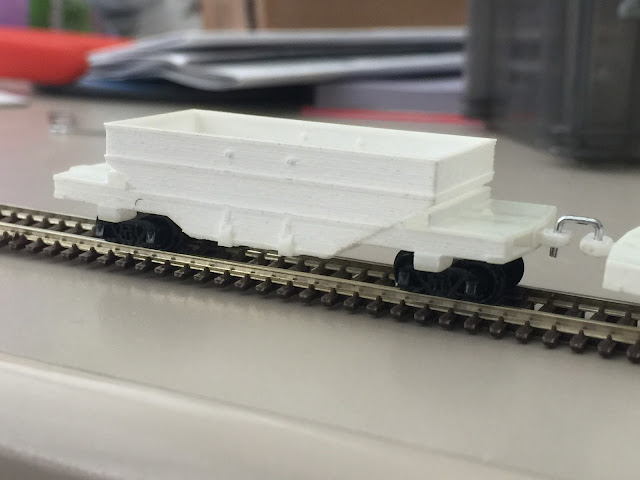
Once I have the proper trucks, I need to check a few clearances, but I am very encouraged. I probably need one more iteration and I will have a great model. Now I need an engine.

These are roller gauges for T-gauge track (3.2mm). I printed them in White Soft and Flexible (Left), Clear Acryllic (Middle) and Metal (Right). The metal gauge needs to have some left over casting material cleaned from the rail gaps, but all three gauges fit nicely on the T-gauge tracks I have. Which means, I now have a tool to lay T-gauge, Zn2, and Nn18 (or Nn2) track by hand. The metal gauge is obviously the best for handlaying, but the others are cheaper and may work well as long as they are not near the soldering iron.
Using a similar design, I also produced roller gauges for Z-scale track (6.5mm).

They are shown here on MT track, and they also work well on the new Atlas Z-scale Flextrack. I haven't tried them on Peco, Rokuhan or Marklin yet, but those will be tested before I release the gauges. You can see that I cleaned out the metal gauge's grooves. My preference is the metal and clear acryllic gauges. The White Strong and Flexible Gauge works, but doesn't have the same precision as the others.
In addition to the gauges, I also printed a new version of my T-gauge Station in Frosted Extreme Detail. The version comes with several spurs of detail parts.

I went for gusto on this print. Here are some closeups of the station.

The model includes interior fireplaces, walls with doorways, and stairs.

Yes, stairs. See them in the center of the photo? Or how about this view.

And yes, they are scale sized. But that is not all. On one of the spurs are the roof pieces and the chimney caps. Plus, there are windows and doors for the model.

The other spur contains furniture for the station. Yes, T-scale (1:450) furniture.
There is a fishbelly stove, tables, benches, chairs, a bed, desk, a cabinet and a bar. Can't see them?

The desks are on the left, then the bed, the round tables are on their sides, followed by a "J" shaped bar and the station waiting room benches. They got a bestine bath and cleaning last night, and next up will be a bit of primer before I start assembly. I'm excited for the finished product. Just need to do the decals for the exterior details.
Another building item was a set of doors for my modular wall system. I got the first two prototypes yesterday. They are already for sale, but this is the first time I have had them in my hands.

On the left is a standard sized door, on the right is a panel roll-up door. The standard door even has a door knob. The paperclip is pointing toward it. Need to zoom in?

Okay, I am at the limits of my camera's ability to focus, but you may just be able to make out the door knob here - the small blob of white on the left side of the door. You will notice that I made the door frame integral to the door in order to print this.
After their cleaning, I did try the doors in the walls I have already printed. Note that they are not yet painted, but here is what they look like.


They fit like a glove, and it looks like the design works well. So, that is encouraging. Next up in this project is an improved modular wall design. I am hoping to reduce the costs a bit, and provide for a number of brick types and bond configurations.
 |
| Gilpin Ore Car Parts |
I tried printing the car a number of different ways. I tried the metallic plastic (top), followed by the White Strong and Flexible Nylon, a Polished Nylon, and as a Frosted Ultra Detail part.
These cars used link and pin couplers, and I also designed a set of them for this car, and printed them in Frosted Ultra Detail (top), Black Nylon, and Elastoplastic.
Finally, the cars also had brake wheels, which are of a geometry that I cold not find already available. This was surprising, since the drawings for the cars call out a different wheel style, but I found two photographs that clearly indicate that the brake wheels looked like those I printed. My best guess is that like the Link and Pin couplers, which were manufactured for the Gilpin Gold Tram by the Colorado and Southern shops, so too were these brake wheels.
The couplers were eyeopening. A close examination of the couplers revealed that the elastoplastic couplers lost a lot of detail, and in fact, do not fit in the existing coupler pocket. They are elastic alright, much more so than I needed. The tolerances on the Black Nylon couplers are better, but still don't fit in the pocket. Unfortunately, the spring features designed into these couplers did not print well either in Black Nylon. They are just too fine. (I thought so going in, but gave it a try. Fortunately, the Frosted Ultra Detail couplers did print well, and with enough resolution to both fit the couple pocket and hold the spring detail. Upon testing the springs (arranged as cantilever beams) even work as designed.


The coupler is designed to use a piece of wire (such as that of a paperclip) as both the link and pin. The U-shaped link-pin simply goes through the hole in the top of the coupler. So, the coupler will ultimately transfer all of the weight of the train to the body of the car. Hopefully, the Frosted Ultra Detail plastic is strong enough for the trains I envision. Worst case, there actually will be broken couplers.

The cars are tiny - a little more than 2 inches long, but they also measure out to within +/- 1 inch of the actual length of the car. They also feature bolts and rivet details. But these are not really visible unless printed in Frosted Ultra Detail. With couplers the car looks like this:

And as an example, I used a paper clip to test the coupler hole size.

I haven't installed trucks yet, or a few other details, including the brake stem. The brake wheels look really good in closeup views.

The outer ring is actually part of the support structure. The brake wheel is actually composed of an HO-scale 1-inch diameter round bar. I may actually make these thicker given that I do not have an actual dimension on the size of the bar used, just to make these a little easier to handle.
All of these parts have had a bestine bath and ultrasonic cleaning. Today, I temporarily but a set of trucks on one car (the wrong type, but at least it was a set of trucks), and made a first attempt at a link-pin from a paperclip. Grabbing a piece of the new Atlas Z-scale flex track, here is the prototype on the rails for the first time.

Once I have the proper trucks, I need to check a few clearances, but I am very encouraged. I probably need one more iteration and I will have a great model. Now I need an engine.
Friday, March 17, 2017
And the shop is open...
Been very busy getting the files uploaded and priced to finally announce:
I am still uploading items, but here is some initial items:

The Model Works at Otowi Station is Now Open!!!
I am still uploading items, but here is some initial items:
N-Scale:
- 1959 FC150s (5 models) in 1, 2 and 4 vehicle packs
- Rock Island Diesel Cooling System Detail
- 8 Modular wall segments in 4- and 10-piece packs + 2 door styles in 4- and 10-piece packs (more coming ASAP)
HO-Scale:
- 1959 FC150s (5 models) in 1, 2 and 4 vehicle packs
- Rock Island Diesel Cooling System Detail
Coming soon:
- More Modular Wall components (I have 24 more segments to load + 180-degree and 90-degree pillasters to load up) and others on the board.
- HOn2 Gilpin Gold Tram Ore Car
- Track Roller Gauges for T (3.2mm) and Z (6.5mm) track. Others to come after my test prints are checked.
- 3 Point Gauges for T and Z and other gauge/scale combos
Please spread the word! There are 52 items currently for sale, and another 52 to load, and 6 more in testing.
Part of the delay has been the task of completing a couple of models, including my most complex model yet. As a preview, here is a render of the Gilpin Ore Car in HOn2.

Description: A Gilpin Tramway Ore Car from the 3rd order of cars, ordered in 1895. The cars were numbered 86-155. Requires some 28 gauge wire to represent the spacing rods across the top of the car, and to represent the brake stems, as well as Z-scale Archbar Trucks. To complete the model, Link and Pin couplers and the Brake Wheel should also be purchased, which are designed to be compatible with this model. In addition, 2 M0.5 0.50UNM Metric Screws are necessary to secure the link and pin couplers. The link can be simulated with 0.7mm wire (such as that used in a paperclip. The car is HO scale, 2' gauge, represented using Z-gauge tracks (6.5mm) which equates to 22.3" in HO scale. Recommended in Frosted Extreme Detail or Frosted Ultra Detail options. Polished materials may have reduced detail.
I am quite pleased with the result and eager to hold the prototype. This will definitely be the subject of an upcoming post.
Please check it out!
Tuesday, February 28, 2017
A Quick Detail Project
I'm getting closer to opening the store, but I took a little time to solve a problem for a friend of mine. He is working on some Rock Island F-7s, and these units have an unusual cooling coil on the roof. See below.


So, there is no N-scale part available, although obviously there are some in HO. Found these images of the HO part.


So, my task was to try to build an N-scale part. A few sketches, and estimates of dimensions later, and here is what I came up with.


Do you see it? How about now?

Turns out this is also on the B-units.


Athearn has it modeled on their Rock Island units, but it looks like they turned theirs 90 degrees.


So, there is no N-scale part available, although obviously there are some in HO. Found these images of the HO part.


So, my task was to try to build an N-scale part. A few sketches, and estimates of dimensions later, and here is what I came up with.


I made the pipes that enter the roof of the cab a bit longer than necessary, so that a pilot hole can be drilled allowing for the pipes to slip into the body of the cab. A few quick checks, and it turns out that this model also passes the initial Shapeways tests. I'm going to make them available in N-scale in FUD (Frosted Ultra Detail) and FXD (Frosted Extreme Detail). I think that the FXD will be the better choice - it has a 16 micron layer thickness, as opposed to 29 microns for FUD, and the price difference is minimal. I'm also going to see how they look in Z-scale and HO. The plan is to offer them as a 2-pack.
All told, about 3 hours, including uploading and testing the part with Shapeways. Could have been a little faster if I had better measurements, but I think it looks good from the eyeball test. Parts like this are one of the places where I think 3D printing shines - little custom detail parts. I'm going to be excited to see them available, and installed on the models. So, I got a few more files to finish and upload, but I hope to open the shop within days.
Watch here for that news!
Subscribe to:
Posts (Atom)